Automating Android Build - Guide to Continuous Integration
Automating Android Build Introduction
Build automation in Android is something that is very useful in production projects, but not only. Continuous Integration and Delivery is not just about publishing the app to Google Play Store, it also allows you to automatically run tests and build app versions for test tracks for your testers. For proper automation setup, you should consider having clear separation of branches for your tracks, so most likely you will have the usual branches of develop, production and feature branches.
CodeMagic Overview
I have decided to describe CodeMagic for Android (and not only) build automation as it is mobile-first and that makes things just much easier! CodeMagic supports Flutter, React Native, Native Android, Native iOS and even Ionic and Unity. Fun-fact, for flutter it even supports web, macOS, Linux and Windows builds!
In the free version of CodeMagic you have 500 minutes of builds - which is more than enough for personal projects and smaller apps that are not released so often, but if you want to use it more often in your flow, you probably will need to take a look at Pay as you go plan.
The alternative to CodeMagic is using Bitbucket Pipelines, Github Actions or any other CI/CD service, but the main advantage of CodeMagic is effortless setup for mobile projects, where all the integrations are already there and easy to setup.
Recommended Workflow Steps for Build Automation
The most common approach is to include 3 steps in your app build automation flow. The steps are: Unit Test, Build, Distribute.
With Unit Tests you will make sure that your code is stable and didn’t introduce any major bugs in your business logic - don’t be fooled, you still might have some bugs in your app! Always be sure to provide the app to your testers before deploying it live to the Store.
The build step is simply responsible for building the apk or appbundle, usually with release config - in order to get the stable, minified and signed application ready to deploy.
The Distribution step integrates with Google Play Store (or AppStore) where it create a new release on specified track.
Additionally, if you have the separate pipeline for Pull Requests, you might add additional step for static code analysis with Detekt or other tool. This will make sure that your codebase is consistent with your conventions.
App Build Automation Step by Step
Foremost, you need to have an account on CodeMagic, here is the sign up link. Next, you will need to create an app. Click “Add application” to enter the wizard. There you need to connect with your Version Control, in my case it is github, and then select repository and technology (native android app).
Once this is done, you are forwarded to workflow editor, which for anything other than Flutter projects is very basic, and first you need to create codemagic.yaml file in root directory of your project. I will describe the creation of codemagic.yaml file from the minimal working workflow, to more advanced one.
Minimal Working Workflow
In your codemagic.yaml, define the workflow for your project
1
2
3
workflows:
 android-workflow:
   name: Android Workflow
The parameters here are pretty straight-forward, so not much to explain. Next thing to do is to set up the commands that will run in your pipeline.
1
2
3
4
5
6
7
8
9
10
11
12
workflows:
 android-workflow:
   name: Android Workflow
   scripts:
     - name: Set Android SDK location
       script: |
        echo "sdk.dir=$ANDROID_SDK_ROOT" > "$CM_BUILD_DIR/local.properties"
     - name: Build Android debug
       script: |
         ./gradlew assembleDebug
   artifacts:
     - app/build/outputs/**/*.apk
The scripts section defines the commands that will run in the pipeline one by one. Each of scripts have the name that will be displayed in codemagic dashboard when running the workflow, so be sure to make it something descriptive. The script is just the command to be run.
The first script is responsible for setting up android SDK on the machine of our workflow, here we are using the SDK provided by Codemagic. (Notice, that all environment variables with prefix CM_ are provided by default by codemagic).
The second step builds the debug apk file for us.
Just below the scripts section, there is artifacts section, here you specify the patterns for artifacts. Codemagic will look for files maching the pattern to make them available for you to download or use in following steps. You can download the artifact by entering the Build details on codemagic dashboard.
And that is the most basic workflow for android builds. Now lets move to more advanced flow.
Advanced Automated Android Build Workflow
In the advanced workflow we will add running unit tests, add release build code signing capabilities, and deployment to google play store.
To add code signing capabilities for release build, first we need to setup the android project for it.
Setup code signing in gradle
In top menu of Android Studio, select “Build -> Generate Signed Apk”, in the wizard select “App Bundle”, and then you will be presented with keystore setup form. Create new keystore, as path select any place on your computer, just keep in mind to not add it to your repository. Generate some strong password, and use it for both keystore password and key password - different passwords for these, are not supported yet in android. Save somewhere safe your password and key alias.
In your root project directory create local.properties file with following values:
1
2
3
4
sdk.dir=<path to your sdk>
keystore.path=<path to generated keystore>
keystore.password=<password to keystore and key>
keystore.alias=<alias for your app in keystore>
Keep in mind to add this file to .gitignore so it is not tracked by repository as well, those are sensitive values.
Now let’s set up the signing in your app/build.gradle file
1
2
3
4
5
6
7
8
9
10
signingConfigs {
   release {
       Properties properties = new Properties()
       properties.load(project.rootProject.file("local.properties").newDataInputStream())
       storeFile = file(properties.getProperty("keystore.path"))
       storePassword = properties.getProperty("keystore.password")
       keyAlias = properties.getProperty("keystore.alias")
       keyPassword = properties.getProperty("keystore.password")
   }
}
By adding signingConfigs to android{} we have fetched keystore information from local.properties file, which will be used while building release builds. Now reference this signingConfig in buildTypes
1
2
3
4
5
buildTypes {
   release {
       signingConfig signingConfigs.release
   }
}
Before we move forward, test that you can successfully build release apk locally with command ./gradlew assembleRelease.
Setup code signing in CodeMagic
In your CodeMagic dashboard, navigate to “Teams” and then to your team. If you are on free account, you will most likely have only “Personal Account”. Find “Code signing identities” section, upload your keystore there and provide alias, and password.
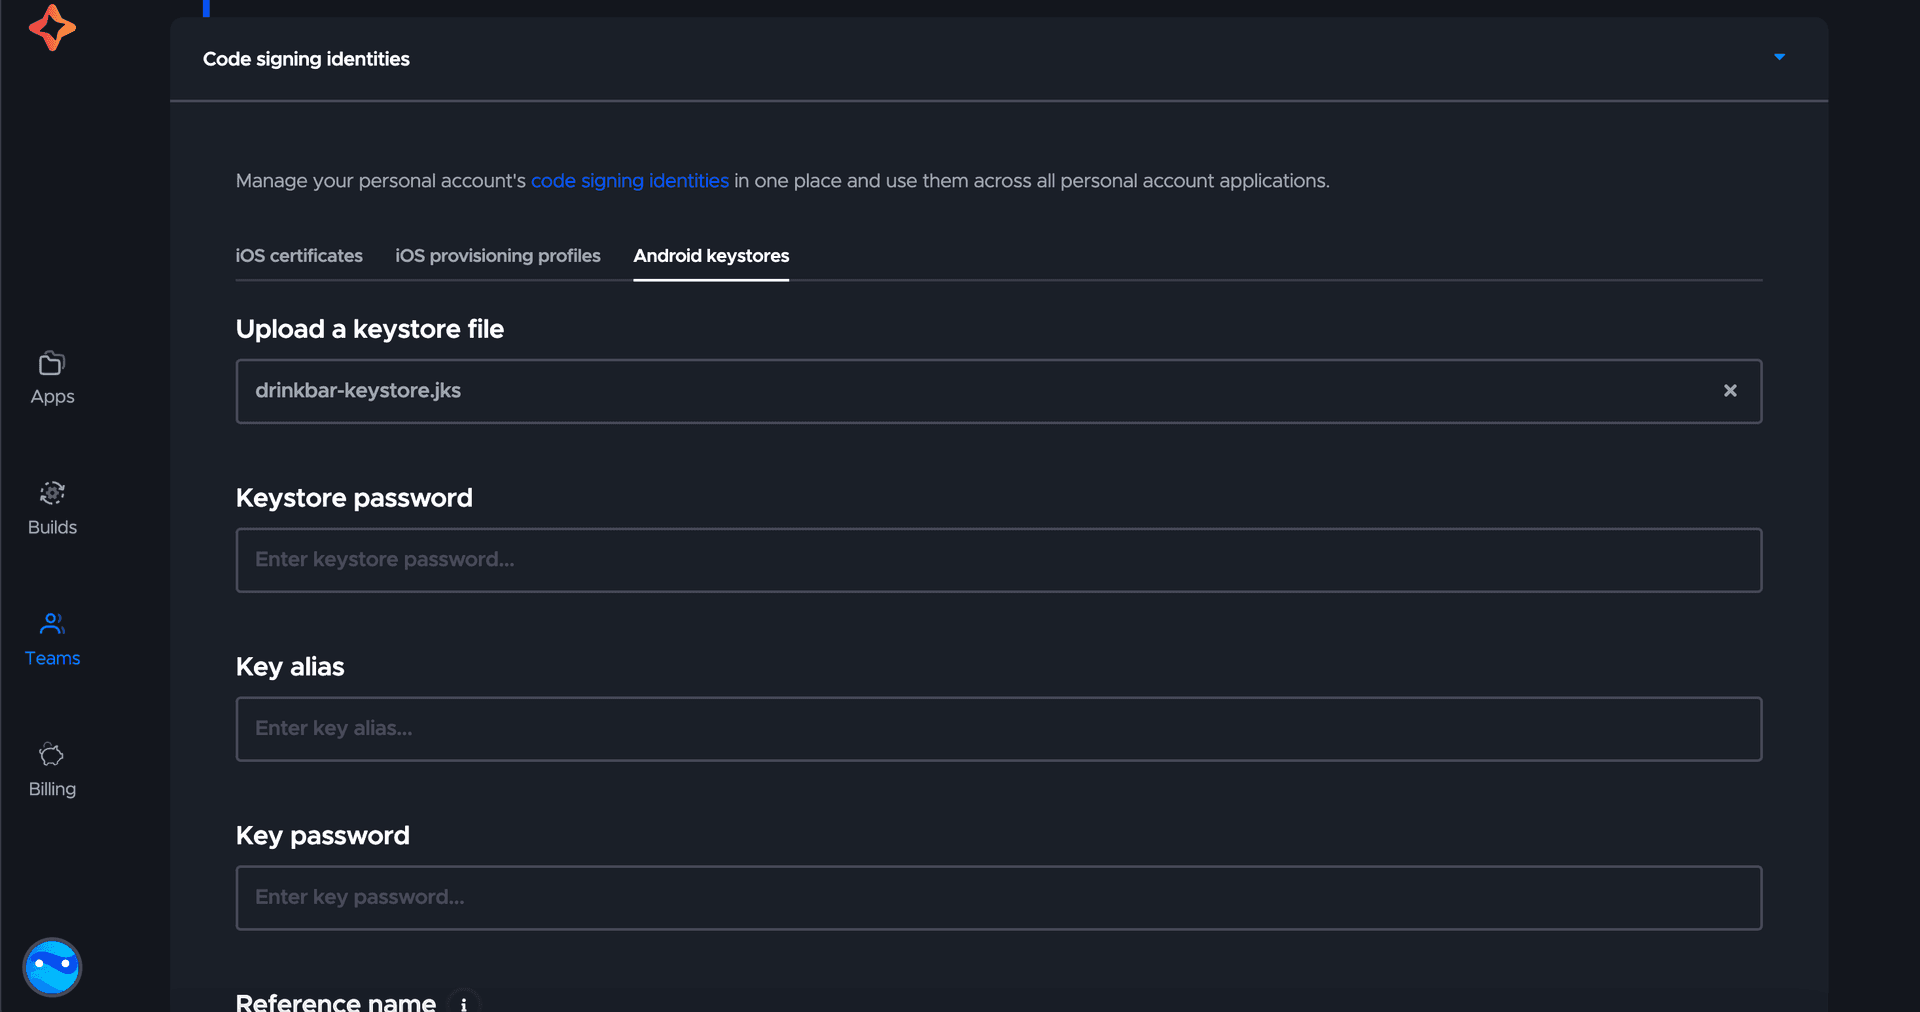
Important, the Reference name, must be unique, it will be used later in codemagic.yaml.
Once this is done, move back to your app/build.gradle, we will need to update our signing config there.
1
2
3
4
5
6
7
8
9
10
11
12
13
14
15
16
17
signingConfigs {
   release {
       if (System.getenv("CI") == "true") {
           storeFile file(System.getenv("CM_KEYSTORE_PATH"))
           storePassword System.getenv("CM_KEYSTORE_PASSWORD")
           keyAlias System.getenv("CM_KEY_ALIAS")
           keyPassword System.getenv("CM_KEY_PASSWORD")
       } else {
           Properties properties = new Properties()
           properties.load(project.rootProject.file("local.properties").newDataInputStream())
           storeFile = file(properties.getProperty("keystore.path"))
           storePassword = properties.getProperty("keystore.password")
           keyAlias = properties.getProperty("keystore.alias")
           keyPassword = properties.getProperty("keystore.password")
       }
   }
}
As you can see, before defining the keystore details, we check if we are running the Continuous Integration. The CI environment variable is set to true by Codemagic runtime. If we are running in the CI, we set the keystore details from environment variables. But how does it know which keystore details to use? That is something that you need to define in codemagic.yaml.
1
2
3
4
5
6
workflows:
 android-workflow:
   name: Android Workflow
   environment:
     android_signing:
       - <ReferenceName>
Somewhere on top of the file, add environment section and reference your keystore that you just created with its Reference name. This way, Codemagic will set the details of this keystore to previously used environment variables CM_KEYSTORE_PATH and others.
Now let’s modify the script and artifacts. As we are slowly moving to releasing to Google Play Store, we will build release app bundle.
1
2
3
4
5
6
7
8
9
scripts:
 - name: Set Android SDK location
   script: |
     echo "sdk.dir=$ANDROID_SDK_ROOT" > "$CM_BUILD_DIR/local.properties"
 - name: Build Android release
   script: |
     ./gradlew bundleRelease
artifacts:
 - app/build/outputs/**/*.aab
In scripts we have changed the command from ./gradlew assembleDebug to ./gradlew bundleRelease in order to build release app bundle instead of debug apk file. The other change is in artifacts - here I have changed the file extension from .apk to .aab.
If you run your pipeline now, it should result with your signed appbundle in artifacts, which you can now download and manually publish on Google Play Store.
Important you need to create at least one release in Google Play Store in order to be able to publish new releases automatically. Otherwise it won't find your app by package name.
Automated Publishing to Google Play Store
Now, In order to be able to publish automatically to play store we need to complete a few steps.
First, create a project for your app in Google Cloud Platform. Then find and Enable “Google Play Android Developer API”. This API allows you to communicate with google play store.
Next, navigate to “IAM and Admin”, and select “Service accounts" in the panel on the left.
Create Service Account, give it some meaningful name and in the next step search and assign Role “Service Account User”. Click “Done” and save the service accounts’ email - it will be required in next steps. While still in Service Accounts page, click “more” and “Manage Keys” on your service account. Add a new JSON key, and save it on your computer. That's all on Google Cloud, now open your google play store console, on the main page of dashboard (outside of your app).
In the menu you will find “Users and permissions” where you will be able to invite a new user. Invite the email of your service account, and give it permission to your app and all permissions related to creating and managing new releases.
Now let's authorize Codemagic to access the play store with created service account. Again in your Team settings, go to “Global variables and secrets” and create a new environment variable GCLOUD_SERVICE_ACCOUNT_CREDENTIALS, as value paste the contents of JSON key of service account, and create a new group for your app.

And the last step - adjusting codemagic.yaml. On top of your file, in environments add group that you just created with environment variable. When referencing group in configuration, it imports all environment variables of this group, so you can access them in your workflow.
1
2
3
4
5
6
7
8
workflows:
 android-workflow:
   name: Android Workflow
   environment:
     android_signing:
       - DrinkBar
     groups:
       - drinkbar
And at the end of the file, we will add new section publishing
1
2
3
4
5
publishing:
 google_play:
   credentials: $GCLOUD_SERVICE_ACCOUNT_CREDENTIALS
   track: internal
   submit_as_draft: true
We defined publishing for google_play, referenced the service account in credentials, defined the track in order to publish new release for internal testing. The last parameter submit_as_draft might me required for you. Generally, before your app setup is finished and it is not yet verified, your app is considered as a “Draft”, and until it is a Draft, your automatic releases will be published as draft for some reason. So if your app is a Draft, you need to have submit_as_draft: true.
Publishing To Email
Additionally, if you don’t have google play account yet, you can also send the new releases directly to a list of emails. In that case, add email to publishing section as follows.
1
2
3
4
5
6
publishing:
 email:
   recipients:
     - jakub.neukirch@stonks.tech
   notify:
     success: true
Automatic Android Builds Summary
The whole process might seem complicated, but it is still much easier with codemagic than other solutions. Codemagic is mobile-first, and already has all the necessary integrations and runtime in place. The most work you have, is authorizing it to use google play store. Additionally, below is the full configuration file.
1
2
3
4
5
6
7
8
9
10
11
12
13
14
15
16
17
18
19
20
21
22
23
24
25
26
27
28
29
30
31
32
33
34
35
36
37
38
workflows:
 android-workflow:
   name: Android Workflow
   environment:
     android_signing:
       - DrinkBar
     groups:
       - drinkbar
   scripts:
     - name: Set Android SDK location
       script: |
         echo "sdk.dir=$ANDROID_SDK_ROOT" > "$CM_BUILD_DIR/local.properties"
     - name: Run Tests
       script: |
         ./gradlew test
     - name: Build Android release
       script: |
         ./gradlew bundleRelease
   artifacts:
     - app/build/outputs/**/*.aab
   triggering:
     events:
       - push
     branch_patterns:
       - pattern: 'master'
         include: true
         source: true
     cancel_previous_builds: true
   publishing:
     email:
       recipients:
         - jakub.neukirch@stonks.tech
       notify:
         success: true
     google_play:
       credentials: $GCLOUD_SERVICE_ACCOUNT_CREDENTIALS
       track: internal
submit_as_draft: trueHire me
I am mobile developer with over 7 years of experience. I have build apps with Flutter and Native Technologies for companies from all around the world. If you are in need of mobile developer, or mobile consultant, feel free to contact me, or select one of the services below. If you want to see my work, check the Portfolio
Android TV Development
Transform Your Content with Stonks' Android TV Development. Specializing in creating dynamic, user-centric Android TV applications, we ensure an immersive and intuitive viewer experience. Harness the power of the big screen with our innovative solutions, tailored to bring your vision to life on Android TV.
From
70€/h + VAT
View more
Android Native App Development
Android Developer for hire is one of my favorite services to provide. Not only because that is what I have begun my journey with more than 7 years ago, but also because of my love for technologies used in that stack. Kotlin, with its slick syntax, gives the best Developer Experience, leading to the best app implementations out there.
From
70€/h + VAT
View more
Lead Mobile Consultancy
Empower your mobile development with Stonks’ Lead Mobile Consultant. Ideal for CTOs, Architects, and leaders seeking expert guidance in mobile strategy, team management, and key decision-making. Transform your mobile presence with our experienced consultancy.
From
100€/h + VAT
View more
Ready to take the next step? Reach out to us at Stonks to discuss your project needs, inquire about our pricing, or take advantage of our unique offer – an 8-hour assignment absolutely free! We're here to help you unlock your project's potential with no commitment required. Contact us today and let's bring your ideas to life!